Apache Virtual Hosts là 1 giải pháp giúp bạn có thể chạy nhiều website (hay nhiều domain) trên cùng Apache Web Server. Nó giúp bạn tận dụng tài nguyên máy chủ, tài nguyên địa chỉ IP, giúp giảm chi phí vận hành.
Bài viết sau sẽ hướng dẫn cơ bản cách tạo Apache Virtual Hosts trên Ubuntu Server.
1. Tiền đề bài viết
Máy chủ server / vps chạy hệ điều hành Ubuntu Server 18.04 (Hoặc bất cứ phiên bản Ubuntu / Debian / Linux Mint). Nếu chưa có thể sử dụng dịch vụ cloud server của Vultr
Tạo 2 website với các thông tin sau đây:
| Website 1 | Website 2 | |
| Domain Name | vinasupport-a.com.test | vinasupport-b.com.test |
| Thư mực lưu trữ website | /var/www/html/vinasupport_a/public_html | /var/www/html/vinasupport_b/public_html |
2. Cấu hình Apache Virtual Hosts trên Ubuntu
2.1. Cài đặt Apache Web Server
Để cài đầy đủ Web Server (LAMP Stack) với Linux, Apache, MariaDB và PHP vui lòng tham khảo bài viết sau: Hướng dẫn cài đặt Web Server ( LAMP Stack ) trên Ubuntu Server
Hoặc đơn giản nếu bạn chỉ muốn cài Apache trên Ubuntu thôi thì chỉ cần chạy command sau:
sudo apt-get install apache2
2.2. Tạo thư mục lưu trữ web cho mỗi một Website.
Tạo thư mục lưu trữ source code cho 2 website:
sudo mkdir -p /var/www/html/vinasupport_a/public_html
sudo mkdir -p /var/www/html/vinasupport_b/public_html
Tạo file index.html cho website vinasupport-a.com:
sudo vi /var/www/html/vinasupport_a/public_html/index.html
Với nội dung như sau:
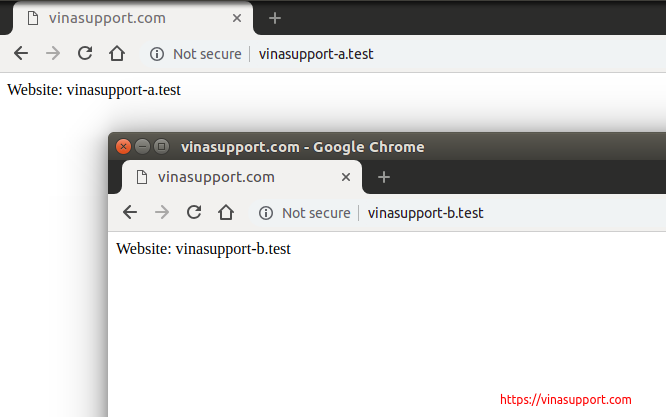
<html>
 <head>
 <title>vinasupport.com</title>
 </head>
 <body>
   <p>Website: vinasupport-a.test</p>
 </body>
</html>
Tương tư tạo file index.html cho website vinasupport-b.com
sudo vi /var/www/html/vinasupport_b/public_html/index.html
Với nội dung như sau:
<html>
 <head>
 <title>vinasupport.com</title>
 </head>
 <body>
   <p>Website: vinasupport-b.test</p>
 </body>
</html>
2.3. Phân quyền cho thư mục lưu trữ website
Để phân quyền chúng ta sử dụng lệnh sau:
sudo chown -R <user>:<group> /var/www/html/vinasupport_a/public_html
sudo chown -R <user>:<group> /var/www/html/vinasupport_b/public_html
sudo chmod -R 755 /var/www/html
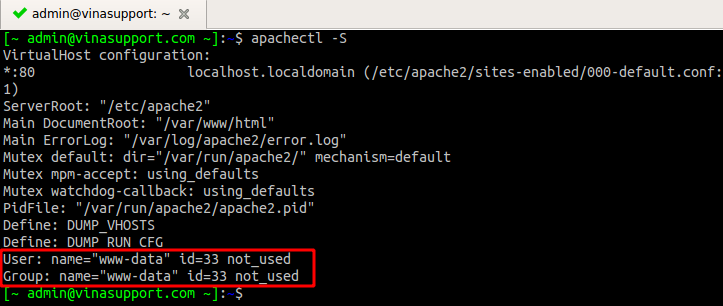
Với <user> và <group> tương ứng là User và Group của Apache Server. Để tim thông tin này sử dụng command “apachectl -S”
2.4. Tạo file Virtual hosts config cho mỗi website
Tạo file config bằng cách copy file template của file config.
sudo cp /etc/apache2/sites-available/000-default.conf /etc/apache2/sites-available/vinasupport-a.test.conf
sudo cp /etc/apache2/sites-available/000-default.conf /etc/apache2/sites-available/vinasupport-b.test.conf
Sau đó sử nội dung của 2 file vinasupport-a.test.conf và vinasupport-a.test.conf như sau:
<VirtualHost *:80>
        ServerAdmin [email protected]
        ServerName vinasupport-a.test
        ServerAlias www.vinasupport-a.test
        DocumentRoot /var/www/html/vinasupport_a/public_html
</VirtualHost>
Và
<VirtualHost *:80>
        ServerAdmin [email protected]
        ServerName vinasupport-b.test
        ServerAlias www.vinasupport-b.test
        DocumentRoot /var/www/html/vinasupport_b/public_html
</VirtualHost>
2.5. Kích hoạt file config của Apache Virtual Hosts
Vô hiệu hóa file config mặc định của Apache và kích hoạt file config cho 2 domain.
sudo a2dissite 000-default.conf
sudo a2ensite vinasupport-a.test.conf
sudo a2ensite vinasupport-b.test.conf
Sau đó khởi động lại Apache
sudo systemctl reload apache2
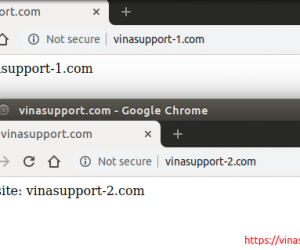
2.6. Test config của bạn.
Sửa file /etc/hosts và thêm 2 domain của bạn vào nếu bạn cần test trên local. Còn không thì cứ mở trình duyệt web gõ tên domain của bạn. Kết quả:
Nguồn: vinasupport.com


Mình đã làm theo hướng dẫn, nhưng khi gõ domain vào thanh url thì được báo là “Not Found
The requested URL was not found on this server.”