Giới thiệu LAMP Stack
LAMP Stack là một nhóm các phần mềm nguồn mở, được cài đặt cùng nhau để cho phép máy chủ lưu trữ các trang web và ứng dụng web động. Thuật ngữ này chính là một từ viết tắt đại diện cho hệ điều hành Linux, phần mềm máy chủ web Apache, hệ quản trị CSDL MySQL (Hoặc MariaDB) và PHP.
Trong hướng dẫn sau đây mình sẽ hướng dẫn các bạn cài đặt trọn bộ LAMP trên Ubuntu Server. Các bạn có thể tham khảo bài viết Cách cài đặt HDH Ubuntu Server 18.04
Cài đặt Web Server (LAMP Stack) trên Ubuntu Server
Để cài đặt các phần mềm trong bài viết này, các bạn cần sử dụng user root, hoặc 1 user có quyền sudo. Trước khi thực hiện cài đặt hãy chạy command sau để update các package mới nhất.
sudo apt-get update
Cài đặt máy chủ web Apache
Apache Web Server là 1 phần mềm máy chủ web nổi tiếng và phổ biến nhất trên thế giới. Nó luôn là ưu tiên hàng đầu của các web master khi cài đặt Web Server. Để cài đặt Apache trên Ubuntu Server, chúng ta sử dụng lệnh apt và cài đặt như bên dưới.
sudo apt-get install -y apache2
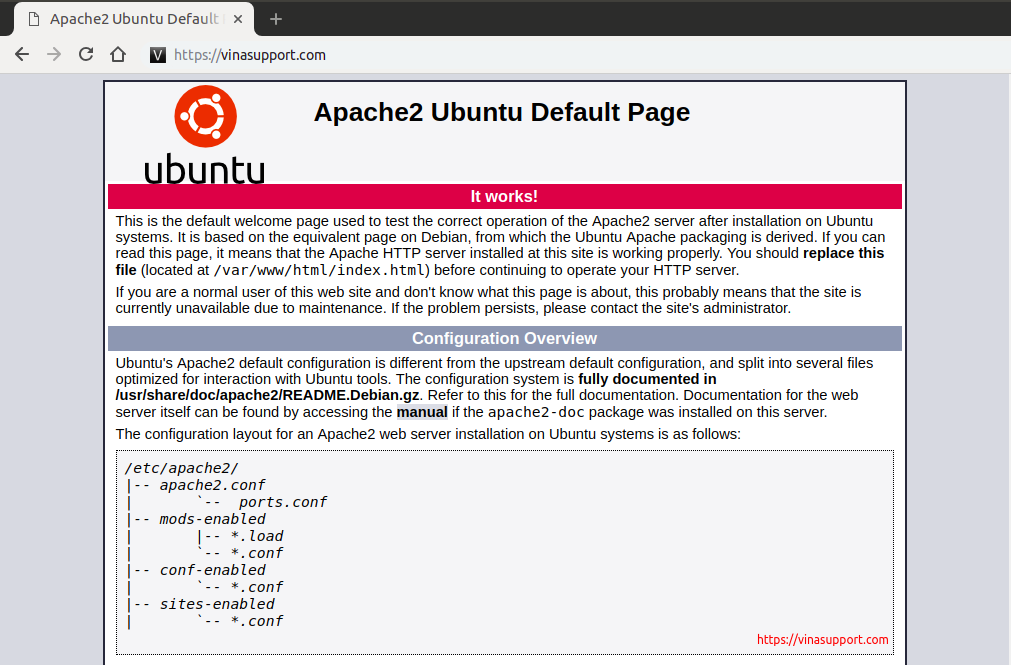
Để kiểm tra xem Apache đã cài đặt thành công hay chưa, chúng ta truy cập theo đường dẫn http://<ten-mien-hoac-dia-chi-ip> . Nếu trang web hiển thị trang mặc định của Apache như hình bên dưới thì việc cài đặt là thành công.
Trường hơp muốn config Apache Virtual Hosts để có thể chạy nhiều domain (website) một lúc thì hãy vui lòng tham khảo bài viết sau: Hướng dẫn cấu hình Apache Virtual Hosts trên Ubuntu
Cài đặt hệ quản trị CSDL MariaDB
MySQL là hệ quản trị CSDL phổ biến. MariaDB ra đời sau nhưng lại đang cực kỳ phát triển và được cộng đồng hỗ trợ ngày một đông đảo. Vì vậy theo xu thế của thế giới thì trong khuôn khổ bài viết này, vinasupport sẽ hướng dẫn các bạn cài đặt MariaDB trên Ubuntu Server.
MariaDB cung cấp cho chúng ta các tùy chọn để cài đặt một cách đơn giản nhất ở link sau:
https://downloads.mariadb.org/mariadb/repositories/.
Bạn có thể chọn HDH, Phiên bản MariaDB cài đặt, và máy mirror chủ cài đặt. Sau khi lựa chọn xong thì nó sẽ tạo ra các câu lệnh giúp chúng ta cài đặt 1 các cực kỳ dễ dàng.
VD: Cài đặt MariaDB trên Ubuntu Server, phiên bản MariaDB 10.4 và máy chủ miror nằm ở Nhật.
Cài đặt các phần mềm hỗ trợ và thêm repository cho Ubuntu Server
sudo apt-get install software-properties-common
sudo apt-key adv --recv-keys --keyserver hkp://keyserver.ubuntu.com:80 0xF1656F24C74CD1D8
sudo add-apt-repository 'deb [arch=amd64,arm64,ppc64el] http://ftp.yz.yamagata-u.ac.jp/pub/dbms/mariadb/repo/10.4/ubuntu bionic main'
Cài đặt MariaDB Server
sudo apt update
sudo apt install -y mariadb-server
Sau khi cài đặt xong, chạy command “sudo mysql_secure_installation” để thay đổi password cho tài khoản root.
Enter current password for root (enter for none): Nhập password trống trong trường hợp cài lần đầu tiên.
[~ [email protected] ~]:~$ sudo mysql_secure_installation

NOTE: RUNNING ALL PARTS OF THIS SCRIPT IS RECOMMENDED FOR ALL MariaDB
      SERVERS IN PRODUCTION USE!  PLEASE READ EACH STEP CAREFULLY!

In order to log into MariaDB to secure it, we'll need the current
password for the root user. If you've just installed MariaDB, and
haven't set the root password yet, you should just press enter here.

Enter current password for root (enter for none):
OK, successfully used password, moving on...

Setting the root password or using the unix_socket ensures that nobody
can log into the MariaDB root user without the proper authorisation.

You already have your root account protected, so you can safely answer 'n'.

Switch to unix_socket authentication [Y/n] Y
Enabled successfully!
Reloading privilege tables..
 ... Success!


You already have your root account protected, so you can safely answer 'n'.

Change the root password? [Y/n] Y
New password:
Re-enter new password:
Password updated successfully!
Reloading privilege tables..
 ... Success!


By default, a MariaDB installation has an anonymous user, allowing anyone
to log into MariaDB without having to have a user account created for
them.  This is intended only for testing, and to make the installation
go a bit smoother.  You should remove them before moving into a
production environment.

Remove anonymous users? [Y/n] Y
 ... Success!

Normally, root should only be allowed to connect from 'localhost'.  This
ensures that someone cannot guess at the root password from the network.

Disallow root login remotely? [Y/n] Y
 ... Success!

By default, MariaDB comes with a database named 'test' that anyone can
access.  This is also intended only for testing, and should be removed
before moving into a production environment.

Remove test database and access to it? [Y/n] Y
 - Dropping test database...
 ... Success!
 - Removing privileges on test database...
 ... Success!

Reloading the privilege tables will ensure that all changes made so far
will take effect immediately.

Reload privilege tables now? [Y/n] Y
 ... Success!

Cleaning up...

All done!  If you've completed all of the above steps, your MariaDB
installation should now be secure.

Thanks for using MariaDB!
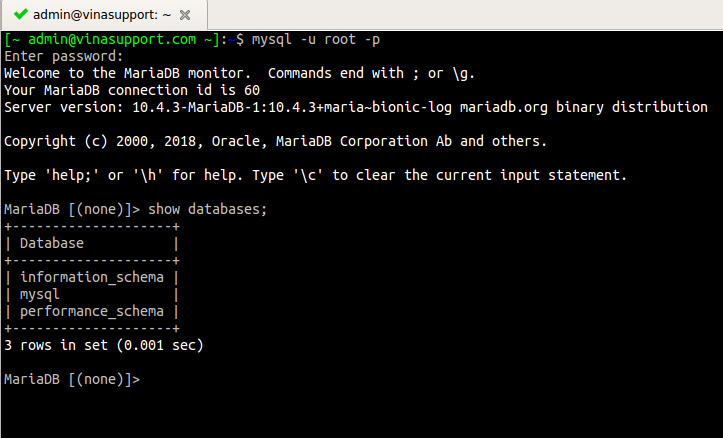
Để kiểm tra xem MariaDB đã cài đặt thành công chưa, chúng ta thử kết nối vào MariaDB bằng lệnh mysql với tài khoản root.
mysql - u root -p
Cài đặt PHP
PHP là thành phần để xử lý mã code để hiển thị nội dung động. Nó có thể chạy các tập lệnh, kết nối với cơ sở dữ liệu MySQL để lấy thông tin và trao nội dung được xử lý cho máy chủ web để hiển thị nội dung lên trang web.
Để cài đặt PHP sử dụng command sau:
sudo apt-get install php libapache2-mod-php php-mysql
Để kiểm tra PHP đã được cài đặt thành công chưa chúng ta tạo 1 file index.php ở thư mục DocumentRoot của Apache là /var/www/html có nội dung như sau:
<?php
phpinfo();
Vì mặc định Apache sẽ tìm file index.html để hiển thị nội dung trang web, vì vậy cần cấu hình để nó tìm file index.php đầu tiên. Chúng ta cần sửa file config /etc/apache2/mods-enabled/dir.conf của Apache với nội dung chỉnh sửa như sau:
<IfModule mod_dir.c>
        DirectoryIndex index.php index.html index.cgi index.pl index.php index.xhtml index.htm
</IfModule>
Đặt index.php lên đầu tiên trước index.html và lưu lại.
Sau đó thực hiện restart lại Apache để cập nhật lại config.
sudo systemctl restart apache2
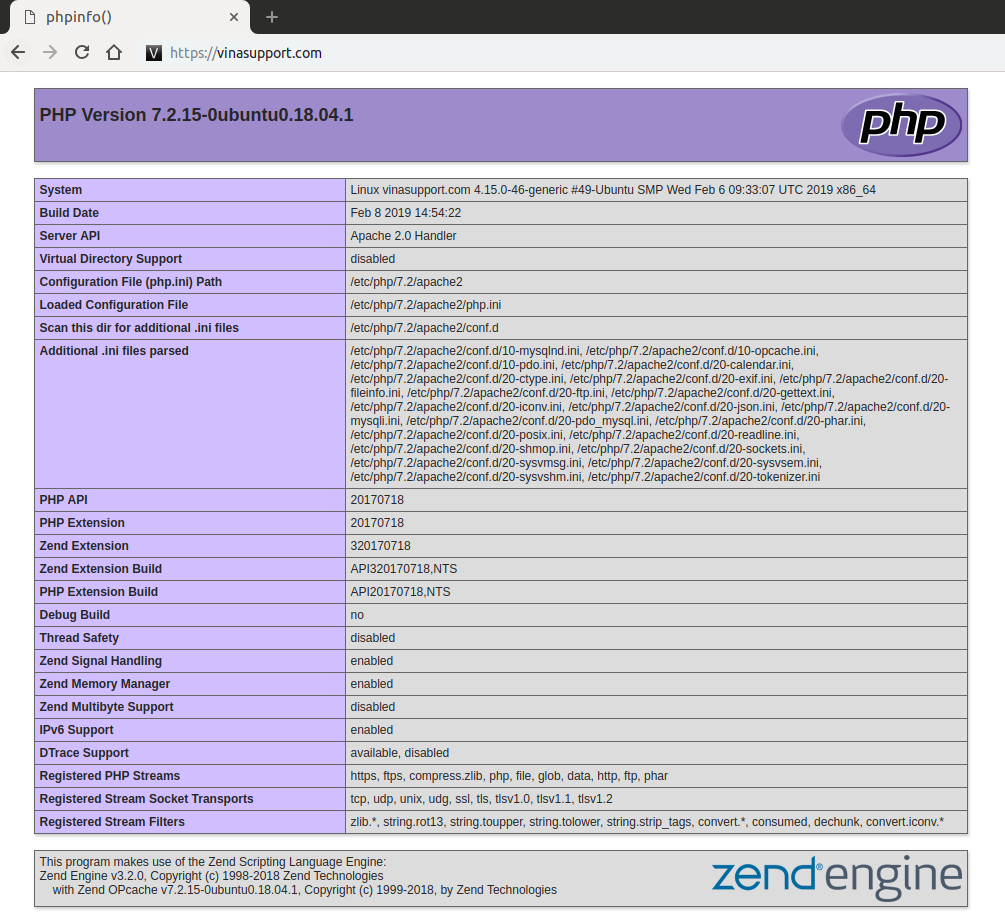
Cuối cùng test lại bằng cách truy cập theo đường dẫn http://<ten-mien-hoac-dia-chi-ip> . Nếu hiển thì thông tin phpinfo thì chúng ta đã hoàn thành việc cài đặt
Sau khi cài đặt xong Web Server với LAMP Stack, chúng ta có thể thực hiện 1 số thứ hay ho trên đó như:
Nguồn: vinasupport.com


![[DevOps] Hướng dẫn docker hóa MySQL](https://vinasupport.com/uploads/2022/10/MySQL-Docker-300x250.png)